Presets
The presets allow you to promptly switch from one settings configuration to another. They let you adjust dozens of settings across a number of panels with a single click.
If you normally write emails where an informal tone is appropriate, you might choose a less restrictive combination of settings: Informal usage. When you have an important letter to write and want stricter settings, you would likely select Formal usage or Maximum sensitivity. Once you have finished correcting your writing, the presets menu lets you easily return to your regular settings. When a preset is active, a check mark appears beside it in the menu.
Spelling and grammar errors are always flagged, regardless of the preset selected.
You can access the presets by opening the Presets menu in the bottom-left corner of the settings.
You can also access the presets from the corrector by clicking the settings icon in the toolbar. For more details, consult the Adjusting sensitivity section of the Corrector chapter.
Choose from the following presets:
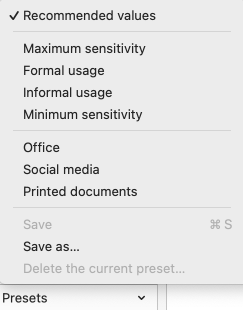
Recommended values
Antidote adjusts all settings to the recommended values.
Maximum sensitivity
Antidote adjusts all relevant language and typographic settings to their maximum level.
Formal usage
Antidote adjusts all relevant language settings to ensure the thorough correction of word usage, syntax, punctuation, capitalization and possible lexical confusion. Typographic settings are similarly adjusted for fine-grained verification based on the recommended usage for your language variety.
Informal usage
Antidote adjusts all relevant language settings to allow for correction that is less strict and disables the settings linked to alerts. Antidote will also disable most of the settings related to typography, so only obvious typographical errors (e.g. two spaces between words) are flagged.
Minimum sensitivity
Antidote adjusts all relevant language and typographic settings to their minimum level.
Custom Presets
If the existing presets do not fully meet your correction needs, you can create your own presets and add them to the menu. You can create as many presets as you want and easily switch between them according to the text being corrected.
To create a custom preset, adjust whichever settings you deem relevant, then click the Presets menu and select Save as. Give your new preset a name that reminds you what it’s for—the name of the client whose latest novel you are editing, for example.
You can use an existing preset (custom or default) as a starting point to create a new one and change only the necessary settings: select a preset from the Presets menu, then change the language or typographic settings of your choice. Once you’ve made all the changes you had in mind, click the menu again and select Save as.
Modifying a custom preset
To edit or update an existing custom preset, select the preset you want to modify from the menu and adjust the settings according to your new needs. A dash appears beside the preset name in the menu to indicate that the current preset has been modified. Select Save to keep your changes, or choose Save as to create a new, separate preset with your reconfigured settings.
Deleting a custom preset
Apply the preset you want to delete, then select Delete the current preset from the menu and confirm the deletion.