SCIM Provisioning Settings
This page describes the automated provisioning settings. If you would like to use provisioning, read the procedure containing detailed instructions for configuring it in Microsoft’s Azure AD. This provider is used as an example, but the procedure is similar for other providers.

Authentication
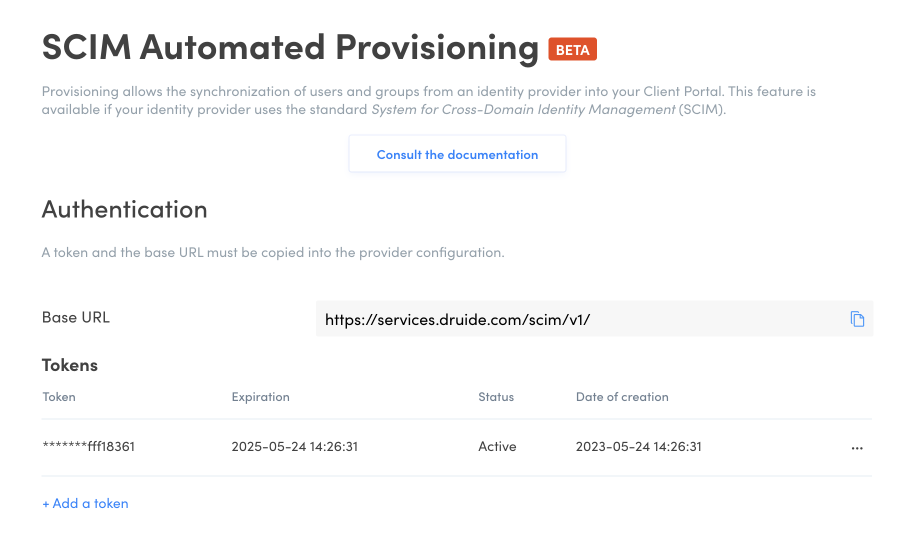
The Authentication section contains information you need to copy over to configure automated provisioning with your provider. You can copy the Base URL by clicking the icon.
Tokens
Tokens are an extra security measure. A token can only be displayed once when it is created. However, you can create more than one token: see the procedure to learn how to create a token.
Automated actions during provisioning (optional)
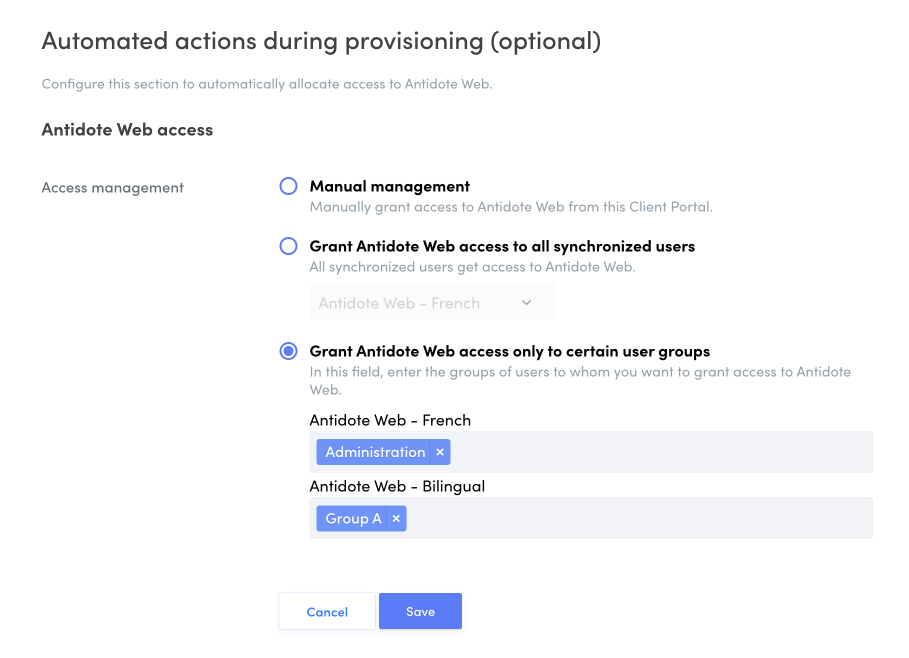
This section lets you see or change the options for granting Antidote Web access automatically. This setting is optional. You need only leave the default setting Manual management selected. If you would like to use a different setting, click Edit to make the changes. There are three options:

- Manual management Choose this option if you do not want to grant Antidote Web access automatically or if you want to use the SAML authentication settings you have already configured. If the manual management option is also selected under SAML authentication settings, no users will be automatically granted Antidote Web access. You can manage access manually from the Users tab in the Client Portal.
- Grant Antidote Web access to all synchronized users Choose this option to automatically grant Antidote Web access to all synchronized users. If your organization holds multiple subscriptions, indicate the one you want to use.
- Grant Antidote Web access only to certain user groups Choose this option to grant Antidote Web access to users according to groups synchronized through automated provisioning. This option is particularly useful if your organization holds multiple subscriptions and, for example, you would like to give one group access to Antidote Web — Bilingual and another access to Antidote Web — French. To register synchronized groups, click in the appropriate field and type the first few letters of the group name, then select from the list of corresponding groups that appears. To remove a group, click the X beside its name. When a user is removed from a group by SCIM synchronization, Antidote Web access will be automatically withdrawn from that user. This also applies for a user added to a synchronized group; that user will be automatically granted access to the Antidote Web subscription associated with the group in question.
You do not need to send out invitations from the Client Portal for users to activate their Antidote Web access. They can log in directly to the Client Portal (services.druide.com) or to Antidote Web (antidote.app).
Important — Access management for Antidote Web through automated provisioning overrides any access configured through Authentication with SAML.
Additional information
Synchronization delay
How long it takes to update provisioned data depends on your management system’s provider. For example, Azure AD checks if data needs to be synchronized about every 45 minutes, while other systems will perform an update whenever any information is changed.
Restrictions on synchronized accounts and groups
Users and groups managed through automated provisioning are marked as “synchronized” in the Client Portal. Several features of the Client Portal are disabled for synchronized items, such as the ability to edit a group or an account, to assign a role or even to grant Antidote Web access, depending on how you have configured your settings.
Main contact
The organization’s main contact holds an account that is never subject to automated provisioning as a security precaution. If you need to change the main contact for your organization, reach out to Antidote Support.