Speed Up Your Correction With the “Ignore” and “Disable” Commands

After checking a potential error flagged by Antidote, do you sometimes find that it doesn’t need to be corrected? Do you proceed to ignore this detection several times in the same document or in multiple correction sessions? Find out how to avoid these redundant interruptions and review your text more efficiently thanks to two simple commands in Antidote.
The Difference Between “Ignore” and “Disable”
Let’s begin by comparing the main commands used to tell the corrector that a detection doesn’t need to be corrected or changed.
| Command | Description | Shortcut |
|---|---|---|
| Ignore | Ignores the current detection or Ignores the current detection as well as identical ones | Tab |
| Disable | Ignore all of the corrector’s detections for this type of case | WindowsAlt + 0 Mac⌘ + 0 |
Why Use the “Ignore” Command?
In the heat of the action, you might decide to save time by scanning over the list of detections, correcting where necessary and leaving the rest alone. However, there are two advantages to using the Ignore command:
- The information is saved, meaning that if you need to interrupt the correction of a document and return to it later, those ignored detections won’t come back.
- Antidote’s actions apply to identical cases. By default, when a number of detections are identical to the current one, ignoring the current detection will also cause identical detections to be ignored. Note that it is still possible to ignore only the current detection by using the Ignore this case command in the context menu.
This command tells the corrector that you have dealt with the detection and that it shouldn’t show it again. With fewer detections and clicks, you’ll need less time to review your text.
When to Use the “Disable” Command
Disabling a correction means that you don’t want Antidote to ever show an alert on a word. In other words, you are permanently ignoring it. You will never need to deal with this detection in the future, regardless of the context. The Disable command applies to a variety of lexical alert types, such as register, regionalisms or false friends.
Here are some examples of cases in which you might want to disable an alert:
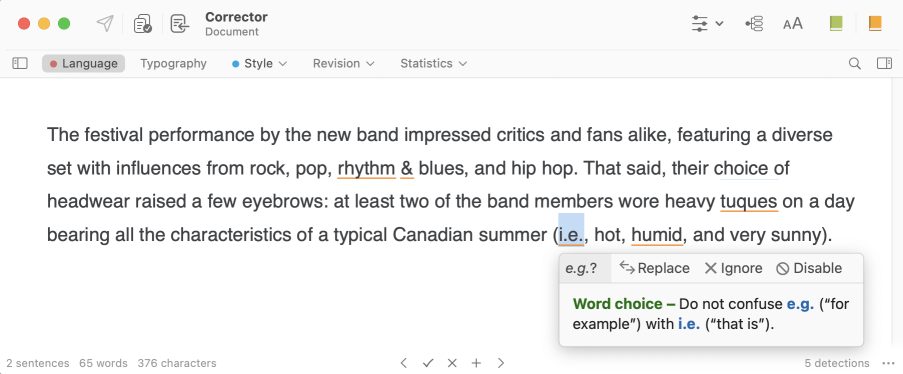
- You understand the limited uses of the ampersand symbol (&), and do not need to be reminded of them when you type it.
- Your readers understand the Canadian term tuque perfectly well and you don’t need to be warned about using it.
- You are well aware of the difference between i.e. and e.g.
You can hide any of these alerts and Antidote won’t show them to you again!
Do alerts stay disabled?
Don’t worry; alerts don’t have to stay disabled forever. Even if you no longer see an alert when correcting, it still exists: you just need to reactivate it in your settings. Click the button in the corrector’s toolbar, select Settings, then open the Disabled alerts panel in the Corrector section.
-
7

From there, select the word associated with the disabled alert that you want to reactivate and click the [-] button at the bottom of the list. Antidote will start showing the alert on this word again.
Not sure? There’s another way!

What if you no longer want to have to deal with a detection, but you still want to know that the detection has been ignored? You can check the box labelled Discreetly underline words with disabled alerts in the settings panel show above, and the corrector will display a faint dotted line to indicate hidden alerts.
The detection will appear in the list but it will already be ignored and you won’t have to act on it. If in doubt, you can always click on the detection to view the tooltip and even reactivate the alert without opening the settings.

Finally, did you know that Anti-Oops! has a similar set of functions to optimize how it works? You can tell it what to correct and when to launch. Find out how by reading our article How to Make Your Anti-Oops! Smarter. It’s full of information that you shouldn’t… ignore. 😉
Get the latest edition of Antidote!
Visit the web store


